Introduction
How To Repair Hole In Plastic Car Bumper: Repairing a hole in a plastic car bumper can seem like a daunting task, but with the right tools and techniques, it’s entirely achievable. Whether the damage is the result of a minor collision, a parking mishap, or general wear and tear, restoring your bumper can save you time and money compared to replacing it entirely. Not only does a repaired bumper enhance the aesthetic appeal of your vehicle, but it also maintains its structural integrity, ensuring safety on the road.
Instructions on how to effectively repair a hole in a plastic car bumper. We’ll cover the necessary materials and tools you’ll need, as well as provide detailed insights into various repair methods suitable for different types and sizes of holes. From filling the hole with epoxy to using a bumper repair kit or employing plastic welding techniques, we’ll discuss the pros and cons of each approach to help you make an informed decision based on your specific situation.
By following these instructions, you can restore your car bumper to its former glory, extending the lifespan of your vehicle and maintaining its resale value. So, let’s dive in and learn how to repair that unsightly hole in your plastic car bumper efficiently and effectively.

Can plastic car bumpers be repaired?
Yes – depending on the extent of the damage, it’s possible to repair a plastic bumper rather than having it replaced. This usually applies to scrapes, scratches, cracks, and small holes – which can be filled and painted to match the original finish, using spot repair methods.
Plastic car bumpers can indeed be repaired, and in many cases, it’s a practical and cost-effective alternative to replacement. Whether your bumper has suffered from a minor scratch, a small crack, or even a hole, there are various repair techniques available to restore its appearance and functionality. One common method involves using epoxy or other adhesives to fill in the damaged area, followed by sanding and painting to blend the repair seamlessly with the surrounding bumper. Additionally, specialized bumper repair kits are available on the market, containing everything you need to fix minor damages quickly and easily.
For more significant damage, such as larger cracks or holes, plastic welding techniques can be employed to bond the broken pieces back together effectively. These methods not only save you money compared to purchasing a new bumper but also contribute to the sustainability of your vehicle by reducing waste. Overall, with the right tools, materials, and know-how, plastic car bumpers can be repaired to a high standard, allowing you to maintain the appearance and integrity of your vehicle without breaking the bank.
What is used to repair a plastic bumper cover?
The filler they used is 3M Automix 5895, a two-part flexible epoxy adhesive designed to repair TPO plastics. TPO stands for Thermo Plastic Olefin and is what many bumpers are made of. The filler comes in two tubes. Squeeze out an equal amount of material from each tube and mix together thoroughly but quickly.
Repairing a plastic bumper cover typically involves using a combination of specialized materials and techniques tailored to the extent of the damage. One common repair material is epoxy adhesive, which is effective for filling in small cracks, scratches, or holes in the bumper surface. Epoxy provides strong adhesion and can be easily shaped and sanded to match the contours of the bumper. Additionally, bumper repair kits are widely available and often include epoxy, along with other necessary materials such as filler compounds, sandpaper, and primers. These kits streamline the repair process and ensure that you have all the components needed to achieve professional results.
For more extensive damage, plastic welding techniques may be employed. Plastic welding involves melting the damaged plastic and fusing it together with a welding rod or filler material. This method is particularly effective for repairing larger cracks or holes and can result in a durable and long-lasting repair. Some plastic bumper repair specialists also utilize heat guns or plastic repair kits that include welding equipment for more intricate repairs.
Can a hole in a plastic bumper be repaired?
Luckily, with the right tools and techniques, you can fix a hole in a plastic bumper fairly easily and avoid a visit to the auto body shop.
Yes, a hole in a plastic bumper can indeed be repaired using various techniques depending on the size and severity of the damage. Small holes, such as those caused by minor impacts or punctures, can often be effectively repaired using epoxy adhesive or other plastic fillers. These materials are applied to the hole, filling it in and creating a solid, smooth surface that can be sanded down and painted to match the surrounding bumper.
For larger holes or more significant damage, plastic welding may be necessary. Plastic welding involves melting the plastic material surrounding the hole and using a welding rod or filler material to bond the broken pieces together. This method creates a strong and durable repair, restoring both the appearance and structural integrity of the bumper.
Additionally, there are specialized bumper repair kits available that contain all the necessary materials and tools to effectively repair holes and other damages to plastic bumpers. These kits often include adhesives, fillers, sandpaper, and primers, providing everything needed to complete the repair process efficiently.
What is the best way to repair plastic parts?
Using Glue or plastic cement
Perhaps the most common method of repairing plastic parts and products, glue and cement are also used when it comes to assembling various parts. Using glue is the most straightforward approach, as you would only need to apply glue to the broken area, and reattach the part accordingly.
The best way to repair plastic parts depends on the type of damage, the material of the plastic, and the desired outcome. However, some common and effective methods include using epoxy adhesives, plastic welding, and utilizing specialized repair kits.
Epoxy adhesives are versatile and can be used to fill in cracks, holes, or gaps in plastic parts. They provide strong bonding and can be sanded and painted to match the original surface, making them ideal for minor repairs.
Plastic welding involves melting the damaged plastic and fusing it together using a welding rod or filler material. This method is particularly effective for repairing larger cracks or breaks and can result in a durable and long-lasting repair.
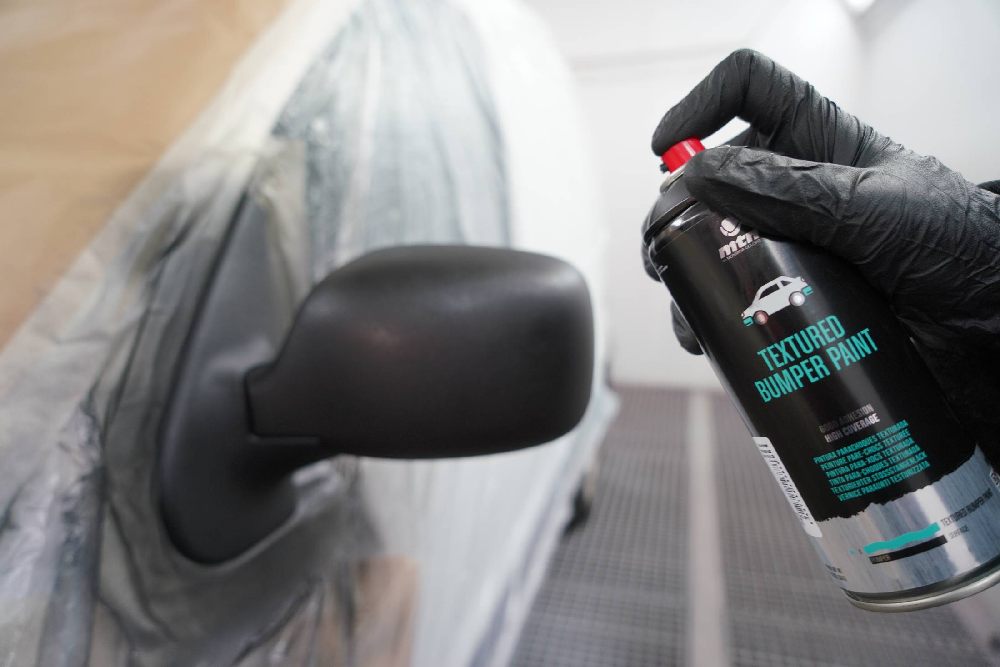
What kind of paint do you use on a plastic bumper?
The Bumper Paint by MOTIP is suitable for plastic surfaces on the car. No need for a plastic primer for better adhesion. A good preparation of course is necessary. Take care your car’s bumper or in this case bumper strips are deeply cleaned.
When painting a plastic bumper, it’s crucial to use a paint specifically formulated for use on plastic surfaces to ensure proper adhesion, durability, and a seamless finish. Automotive-grade paints designed for plastic surfaces typically provide the best results. These paints are formulated with adhesion promoters and flex agents that help them bond securely to the plastic material and withstand the rigors of daily driving.
Among the types of paints commonly used on plastic bumpers are acrylic enamel, urethane, and lacquer-based paints. Each type has its advantages and suitability depending on factors such as the desired finish, durability, and ease of application.
Acrylic enamel paints are popular for their durability and resistance to fading, making them suitable for outdoor use. Urethane paints offer excellent durability and chemical resistance, making them a preferred choice for automotive applications. Lacquer-based paints provide a smooth, glossy finish and are relatively easy to apply, although they may not offer the same level of durability as enamel or urethane paints.
How do I start the repair process?
Begin by cleaning the area around the hole thoroughly with soap and water to remove any dirt, grease, or debris. Let it dry completely before proceeding.
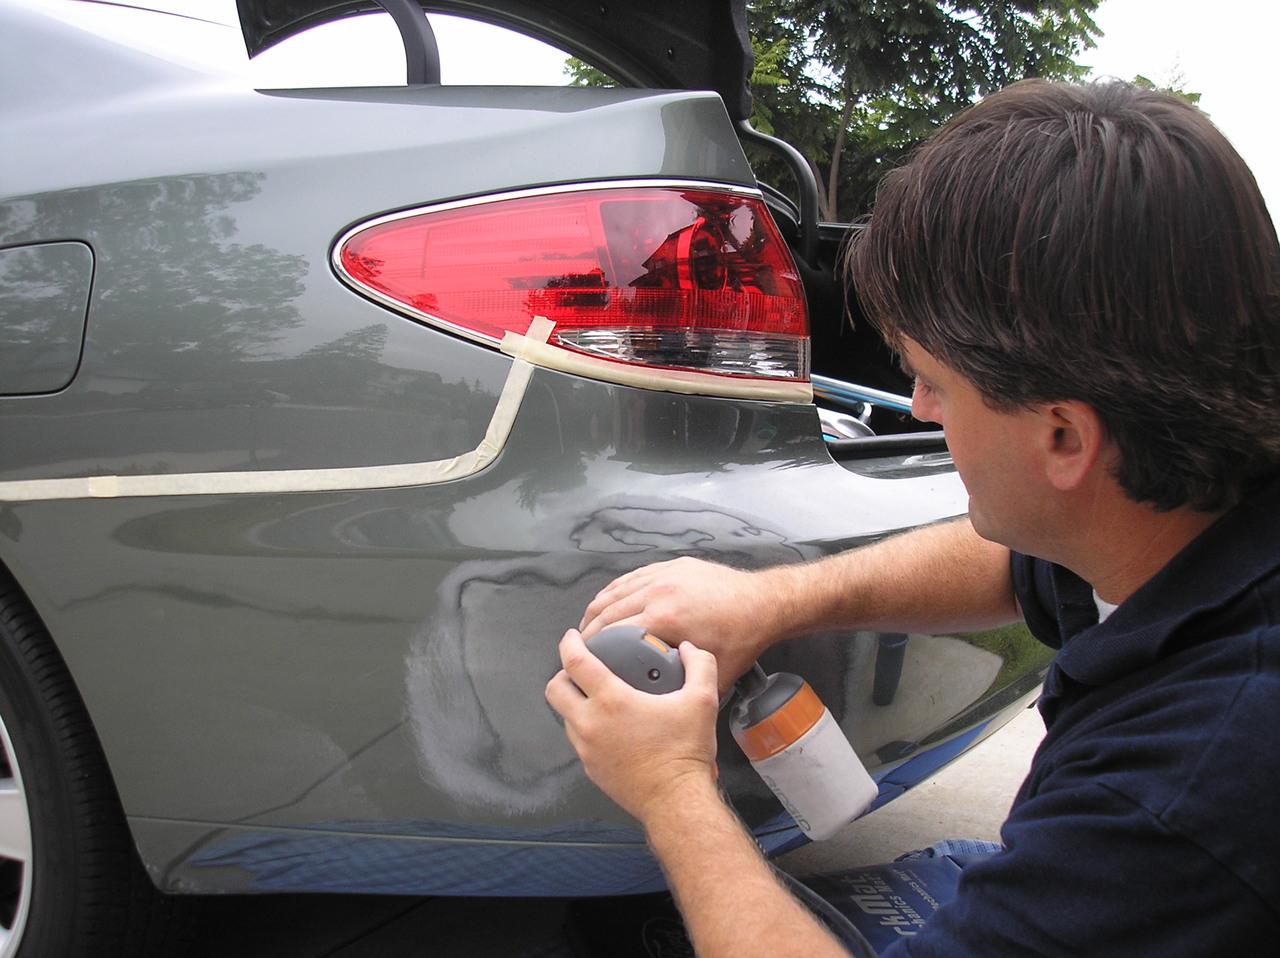
To initiate the repair process for a hole in a plastic car bumper, it’s essential to gather the necessary materials and plan out your approach. Start by assessing the extent of the damage to determine the most suitable repair method. Once you’ve decided on the repair technique, gather the required tools and materials, including epoxy adhesive, plastic filler compound, sandpaper, primer, paint, and any specialized repair kits.
Next, thoroughly clean the damaged area and the surrounding surface to remove any dirt, grease, or debris that could affect the adhesion of the repair materials. Use soap and water for general cleaning, and follow up with a degreaser if necessary. After cleaning, sand the damaged area and the surrounding surface to create a rough texture that promotes better adhesion. Remove any loose material or rough edges to ensure a smooth and even repair surface.
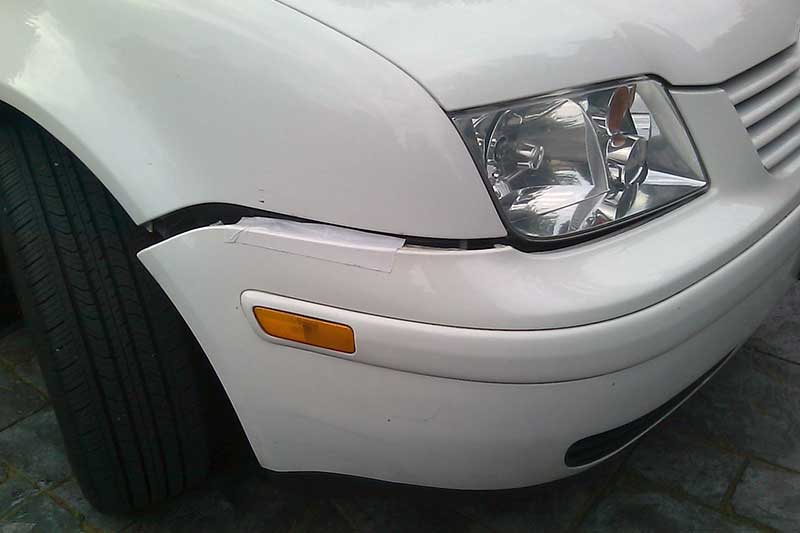
How do I prepare the damaged area for repair?
Use sandpaper to roughen the edges of the hole and create a slightly larger area for the filler compound to adhere to. This helps ensure a strong bond.
Preparing the damaged area for repair is a crucial step in ensuring a successful and long-lasting fix for your plastic bumper. Here’s a step-by-step guide on how to properly prepare the damaged area:
Clean the surface: Start by thoroughly cleaning the damaged area using soap and water to remove any dirt, grease, or debris. Wipe the area dry with a clean cloth to ensure a clean working surface.
Sand the area: Use fine-grit sandpaper to gently sand the damaged area and the surrounding surface. This helps to roughen up the surface, creating better adhesion for the repair materials. Be sure to sand away any rough edges or loose material to create a smooth and even surface.
Remove any rust or corrosion: If the damage has exposed metal beneath the plastic, remove any rust or corrosion using a rust remover or sandpaper. This helps prevent further deterioration and ensures a strong bond between the repair materials and the underlying metal.
Apply adhesion promoter (if necessary): In some cases, especially when using certain repair materials or painting the repaired area, it may be necessary to apply an adhesion promoter to improve bonding. Follow the manufacturer’s instructions for the proper application of the adhesion promoter.
How do I apply the plastic filler compound?
Follow the manufacturer’s instructions for mixing the filler compound, if required. Then, use a putty knife or applicator to fill the hole with the compound, smoothing it evenly over the surface. Make sure to fill the hole completely and level it with the surrounding bumper.
Applying plastic filler compound is a critical step in repairing a damaged plastic bumper, as it helps fill in any cracks, holes, or imperfections in the surface. Here’s a step-by-step guide on how to properly apply plastic filler compound:
Mix the filler: If you’re using a two-part filler compound, mix the components according to the manufacturer’s instructions. Ensure that the mixture is thoroughly blended to achieve a uniform consistency.
Apply the filler: Using a plastic spreader or putty knife, apply the filler compound to the damaged area in thin layers. Start by spreading a small amount of filler over the damaged area, gradually building up the layer until the damaged area is completely covered. Work quickly but carefully to avoid any excess filler spilling onto surrounding areas.
Smooth and shape the filler: Once the filler is applied, use the plastic spreader or putty knife to smooth out the surface and shape the filler to match the contours of the bumper. Feather the edges of the filler to blend it seamlessly with the surrounding surface.
Allow the filler to dry: Follow the manufacturer’s instructions regarding drying time. Typically, plastic filler compounds require several hours to dry completely, depending on factors such as temperature and humidity.
Sand the filler: Once the filler is dry, use fine-grit sandpaper to sand the surface smooth. Sand in a circular motion, gradually smoothing out any rough spots or uneven areas until the surface is level and uniform.
Clean the surface: After sanding, clean the repaired area with a damp cloth to remove any dust or debris. Ensure that the surface is clean and dry before proceeding to the next step, such as painting or further repair.

Conclusion
Repairing a hole in a plastic car bumper is entirely feasible with the right tools, materials, and techniques. By following the step-by-step instructions outlined in this guide, you can effectively restore your bumper’s appearance and structural integrity, saving both time and money compared to replacing the entire bumper. Whether using epoxy adhesive, plastic welding, or specialized repair kits, there are various methods available to suit different types and sizes of holes. Additionally, proper preparation of the damaged area is crucial for ensuring optimal adhesion and a seamless finish.
Remember to clean the surface, sand the area, and apply any necessary adhesion promoters before filling the hole with plastic filler compound. Take care to smooth and shape the filler to match the contours of the bumper, allowing it to dry completely before sanding and painting. By taking these steps and following best practices, you can achieve a professional-looking repair that blends seamlessly with the surrounding bumper.
Ultimately, repairing a hole in a plastic car bumper not only enhances the aesthetic appeal of your vehicle but also contributes to its longevity and resale value. So, don’t let a hole in your bumper be a cause for concern—take action with confidence and restore your bumper to its former glory.