Introduction
How To Install A Bike Rack On A Hatchback: Installing a bike rack on a hatchback can open up a world of cycling adventures, allowing you to transport your bikes conveniently and securely. Whether you’re planning a weekend getaway or simply want to explore new biking trails, knowing how to properly install a bike rack on your hatchback is essential. In this guide, we will walk you through the steps and considerations involved in safely and securely attaching a bike rack to your hatchback. Whether you’re a seasoned cyclist or a beginner, this information will help you get your bikes on the road and ready for your next adventure.
Installing a bike rack on a hatchback is a practical solution for cyclists who need to transport their install bicycles without sacrificing interior space. It’s a relatively straightforward process, but it requires attention to detail to ensure safety on the road. In this guide, we will provide you with step-by-step instructions, tips, and considerations to make the installation of a bike rack on your hatchback a smooth and hassle-free experience.
Whether you’re heading to the mountains for a weekend of mountain biking or just want to take your bikes to the local trails, this guide will help you get started. So, let’s dive into the process of installing a bike rack on your hatchback and get you ready for your next cycling adventure.
Can you put a bike rack on a hatchback car?
Designed to attach to the rear of a vehicle with a strap system, a trunk-mounted bike rack makes using a car rack possible for basically any car – no hitch required! Whether you have a sedan, hatchback, SUV, or van, there’s a trunk bike rack that should fit your vehicle.
Choose the Right Bike Rack: There are various types of bike racks available, including trunk-mounted racks, hitch-mounted racks, and roof-mounted racks. Select a bike rack that is compatible with your hatchback’s design and your specific needs. Trunk-mounted racks and hitch-mounted racks are commonly used on hatchbacks because they are easy to install and remove.
Consider Bike Rack Capacity: Bike racks come in different sizes and capacities. Make sure the bike rack you choose can accommodate the number of bikes you plan to transport. Be mindful of weight limits as well to ensure the safety of your bikes and your vehicle.
Installation: Follow the manufacturer’s instructions for installing the bike rack carefully. Most trunk-mounted and hitch-mounted racks require no tools and can be attached securely to your hatchback. Ensure that the rack is properly tightened and stable before loading your bikes.
Protect Your Car: To prevent scratches or damage to your hatchback’s paint or finish, consider using protective measures such as foam padding or clear protective film where the bike rack comes into contact with the car’s surfaces.
Loading Bikes: Load your bikes onto the rack according to the manufacturer’s instructions. Be sure to secure them properly using straps, cradles, or other mounting mechanisms provided with the rack. Check that the bikes are stable and won’t sway during transit.
Do all bike racks fit on a hatchback?
Trunk bike racks in general fit most regular passenger cars like sedans, hatchbacks, and SUVs. Some trunk racks are designed for specific makes and models, while others can adapt to a wide range of cars.
Type of Bike Rack: There are various types of bike racks, including trunk-mounted racks, hitch-mounted racks, and roof-mounted racks. Each type has its own set of compatibility requirements. Trunk-mounted racks are typically the most versatile for hatchbacks, but hitch-mounted and roof-mounted racks can also be suitable with proper installation and equipment.
Hatchback Design: The design of your specific hatchback can impact bike rack compatibility. Some hatchbacks have spoilers, rear wipers, or other features that may interfere with the installation of certain bike racks. It’s crucial to consider these factors when choosing a bike rack.
Weight Capacity: Ensure that the bike rack you select can safely support the weight of your bicycles. Different hatchbacks have varying weight limits for rear-mounted racks, and exceeding these limits can damage your vehicle or pose safety risks.
Rack Mounting Points: Some hatchbacks have dedicated mounting points or attachment areas that are designed for bike racks or other accessories. These mounting points can simplify the installation process and provide a more secure fit.
Bike Frame Compatibility: Consider the frame design of your bicycles. Some bike racks are better suited for specific frame shapes or sizes. Ensure that your bikes can be securely mounted on the chosen rack.
What kind of bike rack do I need for a hatchback?
Trunk bike racks are mounted to the trunk of your sedan or hatchback and secure bikes using a system of straps. They’re the most economical option for hauling bikes and don’t require a hitch or rack system. These racks can carry one to three bikes.
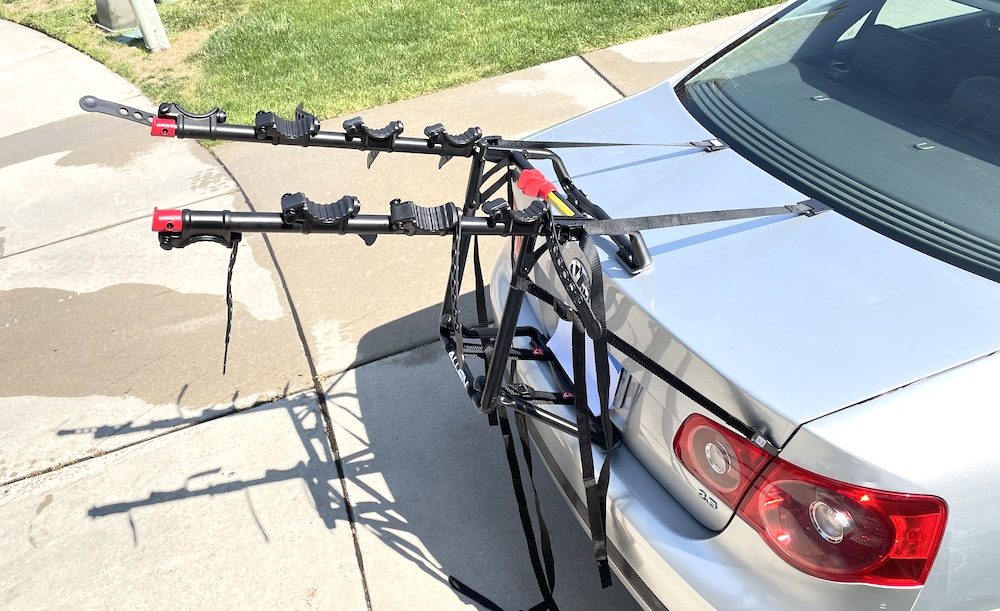
Trunk-Mounted Bike Rack: Trunk-mounted bike racks are a popular choice for hatchbacks due to their versatility and ease of installation. These racks attach to the rear hatch or trunk using straps, hooks, and clips. They come in various configurations to accommodate different numbers of bikes. Trunk-mounted racks are ideal for occasional cyclists and those who want a budget-friendly option that doesn’t require a hitch receiver or roof rails.
Pros: Easy to install and remove, suitable for various hatchback models, cost-effective.
Cons: May obstruct rear visibility, potential for scratching or damaging the car’s finish.
Hitch-Mounted Bike Rack: Hitch-mounted bike racks require a trailer hitch receiver on your hatchback. They are known for their stability and ease of use. Hitch racks can carry multiple bikes, making them an excellent choice for families or avid cyclists. They typically come in two varieties: hanging-style racks and platform-style racks.
Pros: Secure and stable, easy loading and unloading, minimal risk of car damage.
Cons: Requires a hitch receiver installation, can obstruct access to the hatch, may increase the vehicle’s length.
Roof-Mounted Bike Rack: Roof-mounted bike racks attach to the roof of your hatchback. They are a versatile option that doesn’t hinder rear visibility or access to the hatch. Roof racks often require crossbars to which you attach the bike carrier. This type is suitable for hatchbacks with roof rails or a bare roof.
Pros: Unobstructed access to the rear, versatile for other cargo attachments, doesn’t affect vehicle length.
Cons: Requires crossbars, slightly more challenging to load and unload bikes, may affect vehicle height.
How to fit 2 bikes in hatchback?
Take off the front wheel and back wheel of each bike. Lay one in, lay a blanket over it, lay the other bike in rotated 180 degrees to ensure you are not putting any pressure onto either the front or rear derailleur. Lay a blanket over that bike, then set the wheels on top of the pile.
Select the Right Bike Rack: Start by choosing a suitable bike rack for your hatchback. A trunk-mounted rack or a hitch-mounted rack is typically the best option for carrying multiple bikes. Ensure that the rack has a sufficient capacity for two bikes and is compatible with your vehicle.
Prepare the Bikes: Make sure your bikes are clean and well-maintained. Remove any accessories or protruding components like water bottle holders, mirrors, or handlebar extensions to minimize bike width. This will make it easier to fit them into your hatchback.
Position the Bike Rack: Install the bike rack on your hatchback according to the manufacturer’s instructions. Ensure that it is securely fastened and stable. Double-check that the rack won’t obstruct your rearview mirror or license plate.
Load the Bikes: Loading the bikes onto the rack is a critical step. Start by placing the first bike on the rack. Secure it using the rack’s straps, clamps, or attachments as per the manufacturer’s guidelines. Make sure the bike is stable and won’t sway during transport.
Use Frame Protection: To prevent scratches and damage to your bikes and car, consider using frame protection. Foam padding, pipe insulation, or bike frame protectors can be placed on contact points where the bike touches the rack or other bikes.
Can you fit a bike in a Suzuki Swift?
Just once, I’ve managed to fit in 3 bikes into the swift (one on top of the other again) — I don’t give a damn about scratches on the bike (all I need is for them to ride well). I’ve done long drives (say, 300km) with 2 MTBs inside the car. You will be left with quite a bit of space for 4 wheels and more bags too.
Bike Rack: The easiest and most common way to transport a bike in a Suzuki Swift is by using a bike rack. You can choose between various types of racks, including trunk-mounted, hitch-mounted, and roof-mounted racks. Trunk-mounted racks are a popular choice for hatchbacks like the Suzuki Swift. They attach to the rear hatch using straps and are relatively easy to install and remove. Ensure that the rack you choose is compatible with your Swift model.
Foldable or Compact Bikes: If you have a folding bike or a compact bike, you may be able to fit it in the cargo area of your Suzuki Swift without disassembly. Folding bikes are designed to be compact and portable, making them ideal for hatchback transportation. Simply fold the bike and place it in the rear cargo area.
Front Wheel Removal: If you have a standard-sized bike that doesn’t fit in the cargo area or on a bike rack, you can remove the front wheel to reduce the bike’s length. After removing the front wheel, place the bike in the rear cargo area with the rear wheel facing outward. Secure it using bungee cords or straps to prevent it from moving during transport.
Roof Mounting: If you have roof rails or crossbars installed on your Suzuki Swift, you can consider roof mounting your bike. Roof-mounted bike racks are available, and they allow you to transport your bike on the roof of the car. This method keeps the bike out of the cargo area and preserves interior space.
Can I add a bike rack to my car?
Bicycle racks for cars are great add-on items and typically have one of three different mounting locations: the hitch, the trunk or the roof. While there are some variations from one product to the other, most of them work in similar ways.
Select the Right Bike Rack: Choose a bike rack that is compatible with your car’s make and model. There are various types of bike racks available, including trunk-mounted racks, hitch-mounted racks, and roof-mounted racks. The type of rack you select should align with your car’s design and your preferences.
Check for Mounting Points: Before purchasing a bike rack, inspect your car for mounting points or attachment options. Different cars have different features that may facilitate bike rack installation. Look for existing roof rails, a trailer hitch receiver, or dedicated attachment points if your car is equipped with them.
Assess the Rack Compatibility: Ensure that the selected bike rack is compatible with your car’s specific model and year. Bike rack manufacturers often provide fit guides or compatibility checkers on their websites or in product documentation. This information helps you determine if the rack will work with your vehicle.
Install the Bike Rack: Follow the manufacturer’s instructions for installing the bike rack on your car. Installation methods vary depending on the type of rack. Trunk-mounted racks typically attach using straps and hooks, hitch-mounted racks require a hitch receiver, and roof-mounted racks need crossbars or roof rails. Proper installation is crucial for safety and stability.
Secure Your Bikes: Once the bike rack is installed, load your bikes onto the rack according to the manufacturer’s guidelines. Ensure that each bike is securely fastened using straps, clamps, or other attachments provided with the rack. Test the stability by gently rocking the bikes.
Can I fit a bike rack to my car?
If you want a bike rack that can easily be attached and removed at a moment’s notice, then a towbar mounted bike rack will be the option for you. If you don’t want a bike rack blocking visibility at the rear of your vehicle, then a roof-mounted bike rack will be the option for you.
Check Your Car’s Compatibility: Before purchasing a bike rack, determine if your car has the necessary features for mounting the rack. For trunk-mounted racks, you need a clean and accessible rear surface. Hitch-mounted racks require a hitch receiver, which may need to be installed if your car doesn’t have one. Roof-mounted racks require roof rails or crossbars, which you can add if your car lacks them.
Select the Right Bike Rack Model: Choose a bike rack that is compatible with your car’s make and model. Manufacturers often provide fit guides or compatibility checkers to help you find the right rack. Pay attention to weight capacity, as it should accommodate the number of bikes you plan to transport.
Install the Bike Rack: Follow the manufacturer’s instructions for installing the bike rack on your car. Ensure that it is securely fastened and stable. Double-check that the rack won’t obstruct your rearview mirror, taillights, or license plate.
Secure Your Bikes: Load your bikes onto the rack following the manufacturer’s guidelines. Make sure each bike is securely fastened using straps, clamps, or other mounting mechanisms provided with the rack. Test the setup for stability.
Test Drive: Take a short test drive to ensure that the bike rack and bikes remain stable and don’t sway excessively during transit. Listen for unusual sounds that may indicate loose components.
Adhere to Safety Regulations: Be mindful of safety regulations and local laws when using a bike rack. Ensure that the rack and bikes do not obstruct your view of the road or obstruct license plate visibility. Follow speed limits and be cautious while parking and maneuvering.
How do you attach a rear bike rack without eyelets?
P-Clamps aka cushioned metal loop straps, might be the solution you are looking for and can be a alternative to mounting a rear rack to a bike that has no eyelets. Cheap and simple to use, you can find them in most hardware stores.
1. P-Clamps or Hose Clamps:
What You Need: P-clamps or hose clamps (available at hardware stores), bike rack, tools (screwdriver, wrench).
Steps:
Position the bike rack on the rear of your bike frame where you want it to be mounted.
Wrap a P-clamp or hose clamp around the seat stay or rear dropout of your bike frame. Ensure that it aligns with the mounting holes on your bike rack.
Insert screws through the mounting holes on the bike rack and tighten them into the P-clamp or hose clamp using a screwdriver and wrench. Make sure it’s securely fastened.
Repeat the process for the other side of the bike rack if necessary.
2. Seatpost-Mounted Bike Rack:
What You Need: Seatpost-mounted bike rack, tools (Allen wrench).
Steps:
Purchase a seatpost-mounted bike rack, which is designed to attach to the seatpost of your bike.
Adjust the rack’s clamps or brackets to fit your seatpost diameter, and then tighten them securely using an Allen wrench.
Mount your bike rack onto the seatpost. Ensure it’s level and secure.
Load your gear onto the rack as needed. Be mindful of weight distribution to maintain bike stability.
Important Tips:
When using clamps or brackets, make sure they are tightened securely to prevent any movement or rattling during rides.
Double-check the weight limit of your bike rack and avoid overloading it to maintain safety and stability.
Regularly inspect the attachment points and hardware to ensure they remain secure and free from damage or corrosion.

Conclusion
knowing how to install a bike rack on a hatchback is a valuable skill for any cyclist. It opens up possibilities for exploration and adventure, allowing you to easily transport your bicycles to new and exciting locations. While the process may seem daunting at first, following the step-by-step instructions and considering the tips and considerations provided in this guide can make it a straightforward and safe endeavor.
Remember that the safety of your bikes, your hatchback, and other road users depends on proper installation and secure attachment. Always double-check your work, ensure that the bike rack is correctly fastened, and perform a test drive to confirm stability before hitting the road.
With the right bike rack and a bit of know-how, you can enjoy the freedom of cycling in different locations, whether it’s exploring scenic routes, conquering challenging trails, or simply riding in new and exciting environments. Happy cycling!